Jumat, 07 Juni 2024

how to create, design, & crochet ANYTHING with pixel grids - featuring the My Row Counter app!

Hi everyone! My recent YouTube video (a guide on how to crochet grids which you can watch here) featured a lot of tools, methods, and techniques. Here's a clear and quick summary of everything I mentioned in the 40-minute guide.


Step 1: Decide what piece you want to make and its size (including measurements like width and height/length)

For example, a bookmark that has a width of 5 cm and a height of 15 cm.

Step 2: Determine the gauge (the size of your stitch) based on what yarn and hook size you're usin

To do this, crochet a scrap piece with the stitch you want to use for your project. Then, with a ruler/inch tape, record these 2 measurements: the width of 1 stitch and the height of 1 row.

Step 3: Calculate the number of stitches and rows needed for your piece based on the gauge

This part involves a bit of math! To calculate the number of stitches needed, divide the 'width you want' by the 'width of 1 stitch'. To calculate the number of rows needed, divide the 'length/height you want' by the 'height of 1 row'.

Step 4: Create a pixel grid canvas and start designing!

There are 2 ways to do this - If you want to work on your phone/laptop, you can create a blank canvas of grid boxes on https://friendship-bracelets.net/generators/alpha, the width is the number of stitches and the height is the number of rows that you calculated in the previous step. If you'd rather draw, you can use graph/math paper or any paper that has pixel-like boxes. Draw the outline of your piece using the width and height measurements and then color in the boxes to make your design.

For the next 2 steps, I will be using the Row Counter app

Disclosure: This post is sponsored by Row Counter App. All opinions and recommendations are my own.

Quick links to Row Counter app (available to download on iOS & Android):

Website: https://bit.ly/myrowcounter
iOS: https://bit.ly/iosmyrowcounter
Google Play Store: https://bit.ly/androidrowcounter

This app features a lot of handy tools for crocheters (and knitters!) such as:

Row counters (multiple counters per project and you can set reminders for rows as well!). You can import patterns from anywhere into the app (PDFs, Ravelry, Hobbii, Google Drive, and lots more). Highlighter and drawing tool for directly marking important information on your imported pattern. A bunch of free and accessible crochet and knit patterns are also available on the app (including the pattern for my 'lover' shoulder bag which you can view here!) 


Step 5: Preview what your pixel grid design will look like using the 'chart' tool on the My Row Counter app, make adjustments depending on the preview!

You can find the chart tool in the 'pattern creator' when you choose to add content. Replicate your pixel grid design on the chart (using the same stitch/colors that you'll use for your final piece) then click on 'chart preview' to see what your work will look like without having to actually crochet it! You can make adjustments to the chart as necessary.


Step 6: Create a pattern using the 'pattern creator' tool on the Row Counter app

If your project is made up of different pieces (for example, a front and back piece), add 'parts' to your pattern. Then add the 'chart' to your pattern featuring your pixel grid design. Next, using the 'text' content tool, add instructions for each row of your pixel grid. Count how many stitches of each color you have to do (by counting the boxes in the grid) before you switch to the next color, and how many stitches of that color you'll have to do next. For example, the pattern for a row might go something like this: 4 sc with white, 1 sc with pink, 5 sc with white, 3 sc with pink. I recommend doing this so that you can easily continue crocheting your rows rather than stopping after every row and painstakingly counting the boxes and keeping track of rows manually.

Step 7: Follow the grid to crochet your piece using any method you're comfortable with

In the YouTube tutorial, I go over 2 methods: carrying your yarn as you crochet and leaving it to dangle on the wrong side until you need to use that color again. I also show you how and when to switch colors, so I recommend watching that part of the video which starts at 14:38

Here's a bunch of idea boards on Pinterest for inspiration for your pixel grid crochet piece...

Pixel grid ideas: https://pin.it/5iCoWfb Crochet pieces ideas: https://pin.it/2TGj2vZ

Happy crocheting! - Love, Mahum


https://soundcloud.com/nhl-live-radio-stream-broadcast-today/how-to-watch-panthers-vs-oilers-in-game-1-of-the-stanley-cup-final-on-tv-or-streaming-live-on-june-8
https://soundcloud.com/nhl-live-radio-stream-broadcast-today/here-to-watch-panthers-vs-oilers-game-1-in-the-stanley-cup-final-on-tv-or-streaming-live-on-june-8
https://soundcloud.com/nhl-live-radio-stream-broadcast-today/live-florida-panthers-vs-edmonton-oilers-game-1-nhl-stanley-cup-2024-june-8
https://nhlradiostream88.tumblr.com/
https://medium.com/@RadioNhl13147/how-to-watch-panthers-vs-oilers-in-game-1-of-the-stanley-cup-final-on-tv-or-streaming-live-on-june-cea60a9b1308
https://medium.com/@RadioNhl13147/here-to-watch-panthers-vs-oilers-in-game-1-of-the-stanley-cup-final-on-tv-or-streaming-live-on-june-6d58d4d4d55e?postPublishedType=initial
https://medium.com/@RadioNhl13147/live-florida-panthers-vs-edmonton-oilers-game-1-nhl-stanley-cup-2024-june-8-final-schedule-b6f2325a5e19
https://dojour.us/e/30132-how-to-watch-panthers-vs-oilers-in-game-1-of-the-stanley-cup-final-on-tv-or-streaming-live-on-june-8
https://herbalmeds-forum.biolife.com.my/d/76669-how-to-watch-panthers-vs-oilers-in-game-1-of-the-stanley-cup-final
https://www.forexagone.com/forum/questions-debutants/how-to-watch-panthers-vs-oilers-in-game-1-of-the-stanley-cup-final-on-tv-or-streaming-live-on-june-8-122058#219783
https://hackmd.io/@Baymina21/ryxPyjlSC

Rabu, 05 Juni 2024

matching pair of heart bookmarks - crochet pattern & tutorial

Hi everyone! Here's the written pattern for bookmarks for both sides of the heart (left & right). This is a companion pattern to my YouTube tutorial which you can watch here to understand how to switch colors. These bookmarks will also make the cutest little gifts for you & your reader friends/family!

Abbreviations & materials used:

sc - single crochet / ch - chain / BC - background color / CC - contrasting color (color of the heart) / I used a 4.5 mm hook & 100% acrylic yarn to make my bookmarks sturdy. If you want to adjust the size of these bookmarks (eg. make the heart bigger or the bookmark wider), you can learn how to create & crochet with your own pixel grids from this tutorial of mine.

Bookmark 1 (heart's right side)

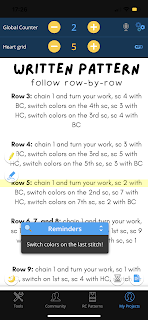
Row 1: start with a slip knot and ch 6, sc into the 2nd ch from your hook, insert 1 sc into every ch (total 6 stitches in each row which is the same number of boxes in the pixel grid)

Row 2 - 10: insert 1 sc into every stitch with BC

Row 11: sc 6 with BC, switch colors to CC on 6th stitch

Row 12: sc 1 CC, switch colors on 1st stitch, sc 5 with BC

Row 13: sc 4 with BC, switch on 4th, sc 2 with CC

Row 14: sc 3 with CC, switch on 3rd, sc 3 with BC

Row 15: sc 2 with BC, switch on 2nd, sc 4 with CC

Row 16: sc 5 with CC, switch on 5th, sc 1 with BC

Row 17: sc 2 with BC, switch on 2nd, sc 3 with CC, switch on 3rd, sc 1 with BC

Row 18 - 28: sc 6 with BC

Bookmark 2 (heart's left side)

Row 1: start with a slip knot and ch 6, sc into the 2nd ch from your hook, insert 1 sc into every ch (total 6 stitches in each row which is the same number of boxes in the pixel grid)

Row 2 - 11: insert 1 sc into every stitch with BC

Row 12: sc 5 with BC, switch on 5th, sc 1 with CC

Row 13: sc 2 with CC, switch on 2nd, sc 4 with BC

Row 14: sc 3 with BC, switch on 3rd, sc 3 with CC

Row 15: sc 4 with CC, switch on 4th, sc 2 with BC

Row 16: sc 1 with BC, switch on 1st, sc 5 with CC, switch on 5th

Row 17: sc 1 with BC, switch on 1st, sc 3 with CC, switch on 3rd, sc 2 with BC

Row 18 - 28: sc 6 with BC

Happy reading & crocheting! - Lots of love, Mahum

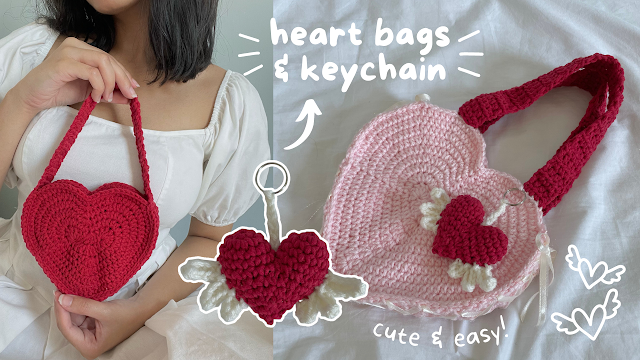
how to crochet a heart bag & keychain with wings | pattern + video tutorial


Hi everyone, today starts the beginning of my valentine's day pattern/tutorial collection! We're starting with a cute accessory to wear with your outfits - a heart-shaped bag* and an adorable little key chain.

Before following the pattern, I highly recommend watching the video tutorial. If you're confused at any point on how to follow the pattern, I explain with demonstrations in that tutorial!

Abbreviations used:
ch - chain / sc - single crochet / ss - slip stitch / hdc - half double crochet / dc - double crochet

Pattern explanations:
If the number comes before the stitch name - insert that number into the same stitch. Eg. 2 hdc means that you have to insert 2 hdc into the same stitch.
If the number comes after the stitch name - insert that stitch into the next 'number' stitches. Eg. 1 sc x 3 means that you have to insert 1 sc into the next 3 stitches.
More examples - 
2 dc x 2 means that you have to insert 2 dc (into the same stitch) for the next 2 stitches.
1 hdc x 6 means that you have to insert 1 hdc into the next 6 stitches.

Please note: if you're confused during any of the steps, you can refer to my youtube tutorial here.

Part 1 - Heart pieces for the bag (end each round by slip stitching into the 1st stitch of the round, start each round by inserting the first stitch of that round into the same stitch where you slip stitched / total stitch counts for each round is included in the bracket)

Round 1 (23):

Start with a slipknot, ch 8, 1 dc into 3rd ch from your hook, 1 dc, 3 dc x 2, 1 dc, 4 dc, *now work on the other side of the ch*, in the same stitch as the previous 4 dc - insert 3 dc (total 7 dc in that ch), dc 4 together, 6 dc, ss into the first stitch of the round (do this to end EVERY round)

Round 2 (38):

2 hdc (into the same stitch as the ss from the previous round, start EVERY round by inserting the first stitch into the same stitch as the ss), 1 hdc x 4, 3 dc, 1 hdc x 4, 2 hdc x 2, 3 hdc x 2, 2 hdc, 1 sc, sc 2 together, 1 sc, 2 hdc, 3 hdc x 2, 2 hdc

Round 3 (49):

1 hdc x 7, 2 dc x 2, 1 hdc x 8, 2 hdc x 6, 1 sc x 2, sc 4 together, 1 sc x 2, 2 hdc x 6, 1 hdc

Round 4 (60):

1 hdc x 9, 3 dc, 1 hdc x 12, *2 hdc, 1 hdc* x 4, 2 sc, 1 sc x 2, sc 2 together, 1 sc x 2, 2 sc, *1hdc, 2 hdc* x 4, 1 hdc x 3

Round 5 (69):

1 hdc x 10, 2 dc x 2, 1 hdc x 13, *2 hdc, 1 hdc, 1 hdc* x 4, 2 sc, 1 sc, sc 4 together, 1 sc, 2 sc, *1 hdc, 1 hdc, 2 hdc* x 4, 1 hdc x 3

Round 6 (80): 

1 hdc x 12, 3 dc, 1 hdc x 15, *2 hdc, 1 hdc x 3* x 4, 2 sc, 1 sc x 2, sc 2 together, 1 sc x 2, 2 sc, *1 hdc x 3, 2 hdc* x 4, 1 hdc

Round 7 (89): 

1 hdc x 13, 2 dc x 2, 1 hdc x 13, *2 hdc, 1 hdc x 4* x 4, 2 sc, 1 sc x 2, sc 4 together, 1 sc x 2, 2 sc, *1 hdc x 4, 2 hdc* x 4, 1 hdc x 2

Round 8 (100):

1 hdc x 15, 3 dc, 1 hdc x 16, *2 hdc, 1 hdc x 5* x 4, 2 sc, 1 sc x 2, sc 2 together, 1 sc x 2, 2 sc, *1 hdc x 5, 2 hdc* x 4, 1 hdc

Round 9 (111):

1 hdc x 16, 2 dc x 2, 1 hdc x 17, *2 hdc, 1 hdc x 6* x 4, 2 sc, 1 sc x 2, sc 2 together, 1 sc x 2, 2 sc, *1 hdc x 6, 2 hdc* x 4, 1 hdc

Round 10 (122):

1 hdc x 18, 3 dc, 1 hdc x 19, *2 hdc, 1 hdc x 7* x 4, 2 sc, 1 sc x 2, sc 2 together, 1 sc x 2, 2 sc, *1 hdc x 7, 2 hdc* x 4, 1 hdc

Round 11 (133):

1 hdc x 19, 2 dc x 2, 1 hdc x 20, *2 hdc, 1 hdc x 8* x 4, 2 sc, 1 sc x 2, sc 2 together, 1 sc x 2, 2 sc, *1 hdc x 8, 2 hdc* x 4, 1 hdc

Round 12 (144):

1 hdc x 21, 3 dc, 1 hdc x 22, *2 hdc, 1 hdc x 9* x 4, 2 sc, 1 sc x 2, sc 2 together, 1 sc x 2, 2 sc, *1 hdc x 9, 2 hdc* x 4, 1 hdc

If you want to do more than 12 rounds to make it bigger:

End the rounds the same way then insert 1 hdc in each stitch around the heart. This will not affect the shape of your heart since you'll already have a base of rounds that give it the heart shape.

Part 2: Strap pieces

For this step, the width and length are completely up to you! You can also use any stitch (I recommend using sc or hdc since dc would be looser and stretchier). If you want a thicker/wider strap, do more chains at the beginning. If you want a longer strap, do more rows. 

Part 3: Heart keychain

To crochet the heart piece, I followed this class on Skillshare - How to Crochet a Heart by Breanna Presley. Since the pattern belongs to that creator, I can't share it for free here. But because my recent YouTube video is sponsored by Skillshare, you can access the class to make the keychain using the 1-month free membership here (as well as a lot of other classes too!).

Right side (the wing starts from the bottom up) - Attach yarn onto the bottom side of the heart, ch 4, sc into the 2nd ch from your hook, 1 hdc x 2, ss into the side of the heart, ch 5, sc into the 2nd ch from your hook, 1 hdc x 3, ss into the side of the heart, ch 6, sc into the 2nd ch from your hook, 1 hdc x 4, ss into the side of the heart, fasten off.

Left side (the wing starts from the top down)Attach yarn onto the top side of the heart, ch 6, sc into the 2nd ch from your hook, 1 hdc x 4, ss into the side of the heart, ch 5, sc into the 2nd ch from your hook, 1 hdc x 3, ss into the side of the heart, ch 4, sc into the 2nd ch from your hook, 1 hdc x 2, ss into the side of the heart, fasten off.

*Disclaimer: This heart-shaped bag is based solely on my heart cushion tutorial and follows the same pattern for rounds 1-12. 

Senin, 03 Juni 2024

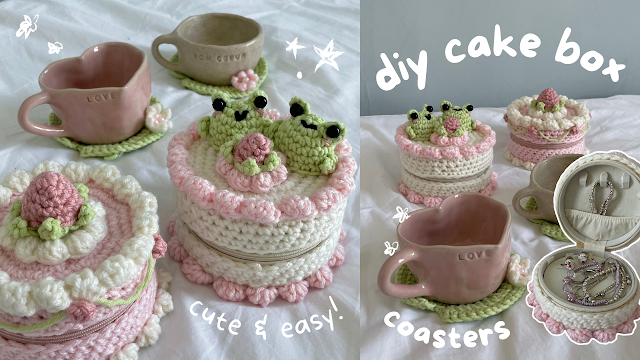
diy crochet cake box (with frogs, frosting, and strawberries!) | pattern + video tutorial


Hi everyone! These are the written patterns for my YouTube tutorial. I highly recommend watching the video to better understand how to follow the patterns since this project is completely customizable and leaves room for you to come up with your own patterns. Lots of love as always <3

still loading...

how to crochet ANY iPad/laptop/kindle/book sleeve with pixel grid designs (step-by-step guide)

Hi everyone! As part of my in-depth youtube tutorial, here's a summary of how to design & crochet ANY sleeve for your ipad/laptop/kindle with pixel grids <3

Step 1: PLAN

Decide on which object you want to make the sleeve for and have a general idea about what pixel grid design you want to create. I've got a ton of designs and inspirations saved on this Pinterest board (I regularly update the board with new pieces I've found!).

Step 2: BACK PIECE

Crochet a plain back piece for your sleeve. To do this, start with a slip knot, then chain the same length as your object. Write down how many stitches (this is the width) and rows (this is the height) you made.

[ Optional step 1If you're making this sleeve for a thicker object, crochet a few extra rows to make up for the thickness before you start following the grid for the front piece. For example, ]

Step 3: PIXEL GRID

This is the site where I like creating my pixel grids (you could also use graph paper or draw on a blank pixel grid in Procreate). Head to 'generate' then 'alpha pattern'. Create your pixel grid according to the size of your back piece -> the number of stitches is the width and the number of rows is the height. Use pixel/fill mode to design the blank pixel grid!

[ Optional step 2: using the pixel grid you've created, for every row -> write down how many stitches there are for each color from left to right then right to left. This will create a pattern for your pixel grid that's easier to follow along than counting every stitch as you crochet it row-by-row ]

Step 4: FRONT PIECE

Use the 'carry on' or 'floating yarn' method to crochet using the pixel grid. These methods are shown in detail and with lots and lots of examples. So, please watch the clips in the video carefully to understand how to crochet using these methods. If you're using 2 colors, I recommend the 'carry on' method. But if you're using a much darker + lighter color or more than 2 colors, I recommend using the 'floating yarn' method. If you have a very dominant background in a light color and objects in just a specific part of the grid (like my Snoopy laptop sleeve), then I recommend using a mix of both methods like in the video.  

[ Optional step 3: it can be hard to show circular eyes/blush in pixel grid designs, so you could add these as separate pieces onto the front piece like I did in the video for my frog sleeve. To make circular pieces, start with a magic ring then insert single crochets into the ring till the circle is as big as you want ]

Step 5: JOINING THE PIECES

Fold your work in half so that the wrong sides of your pieces are facing outwards (towards you) and the right sides are facing inwards (folded against each other). Align the sides of your pieces, insert your hook through the edges of both the aligned pieces, then slip stitch the sides together.

[ Optional step 4: sew on some buttons or titch buttons as a closure/clasp for your sleeve ]

Fasten off and you're done!

Happy crocheting & lots of love as always,
Mahum


how to crochet easy bag charms - star, butterfly, & photocard holder (free patterns + video tutorial)


Hi everyone! These are the written patterns for my youtube tutorial. I'd love to see which one you'll make, tag me on instagram or tiktok @mahumcrochets

Mini star:

Make a magic ring (we're going to work in continuous circles so please use a stitch marker or bobby pin to mark the first stitch of each round, start the next round from the first stitch of the previous round)

Round 1 (total 5 st): insert 5 sc into the magic ring

Round 2 (total 10 st): insert 2 sc into every stitch

Round 3 (total 15 st): repeat *1 sc, 2 sc in the same stitch*

Round 4 (repeat to make 5 points of the star): insert in the same st *sc, hdc, dc, hdc, sc*, then ss into the next 2 stitches

Slightly bigger star:

Make a magic ring (we're going to work in continuous circles so please use a stitch marker or bobby pin to mark the first stitch of each round, start the next round from the first stitch of the previous round)

Round 1 (total 5 st): insert 5 sc into the magic ring

Round 2 (total 10 st): insert 2 sc into every stitch

Round 3 (total 15 st): repeat *1 sc, 2 sc in the same stitch*

Round 4 (total 20 st): repeat * 1 sc, 1sc, 2 sc in the same stitch*

Round 5 (repeat to make 5 points of the star): insert in the same st *sc, hdc, dc, hdc, sc*, then ss into the next 3 stitches 

Butterfly:

Make a magic ring, chain 3, insert a dc into the magic ring (this counts as your first cluster)

Repeat 7 times: chain 2, insert 2 dc into the magic ring

Chain 2 then slip stitch into the 3rd chain and fasten off

Attach the next color into the dc space (you can refer to the video tutorial to see which space I'm talking about!), start the following steps from the chain 2 space

In every chain 2 space: insert 6 double crochets

In every dc space: slip stitch

Slip stitch into the chain then chain 8

Fold the piece in half and wrap the chain around the center

Photocard holder:

Back piece - make a slip knot, chain the length of the width of your picture, crochet rows of single crochet till your piece is the same size as your picture, fasten off

Front piece - make a slip knot, chain the same number of chains that you did for the back piece, crochet 2-3 rows of single crochet (this is the bottom border), crochet rows (1 less than the total number of rows you need for the side border) consisting of 2-3 single crochet stitches (this is the first side border), fasten off the first side border, attach your yarn onto the other side, crochet rows consisting of the same number of single crochet stitches as the other side border (1 more row than the first side border to make the second side border), chain the difference to connect the second side border to the first, single crochet into the stitches of the first side border, crochet 2-3 rows of single crochet to make the top border (also work the stitches into the chains)

Slip stitch the front piece and back piece together

Happy crocheting & lots of love as always,
Mahum


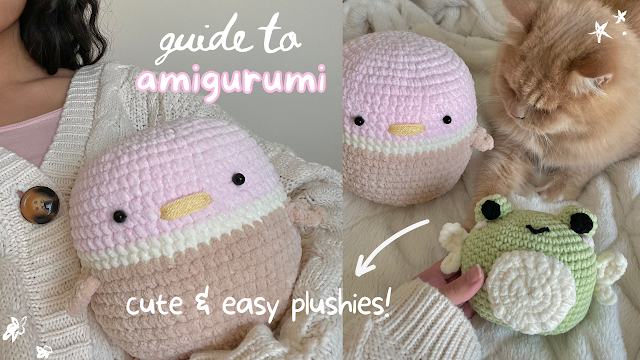
cute & easy DUCK & FAIRY FROG plushie - free amigurumi patterns + video tutorial (inspired by squishmallows!)

cute and easy amigurumi duck and fairy frog crochet tutorial

Hi everyone, here's how to make these 2 easy & adorable squishmallow-inspired amigurumi plushies! Please note that this is a companion free pattern for my in-depth youtube tutorial. I highly recommend referring to the video for demonstrations for all the parts if you're confused, that's why I've mentioned the exact timestamp for the steps

Abbreviations & terminology

ss - slip stitch / sc - single crochet / increase - 2 sc in the SAME stitch / work in continuous rounds and use a stitch marker/bobby pin to mark the first stitch of every round

 ice cream duck 🍦

Part 1: top section (increase rounds - 7:54 in video)

Make a magic ring (or make a slip knot, chain 4, ss into the 1st chain, work the following stitches in the circle made in between the chains - if you're confused, you can watch the video at 8:58)

Round 1 - 8 sc

Round 2 (16) - 2 sc (increase) in every stitch 

Round 3 (24) - 1 sc, increase

Round 4 (32) - 2 sc, increase

Round 5 (40) - 3 sc, increase

Round 6 (48) - 4 sc, increase

Round 7 (56) - 5 sc, increase

Round 8 (64) - 6 sc, increase

Part 2: body (repeat rounds - 18:34 in video)

Round 9 to 14 (64 stitches in all of these rounds) - 1 sc in every stitch

Switch colors - demonstration at 36:08 in video

Round 15 and 16 (64 stitches in all of these rounds) - 1 sc in every stitch

Switch colors - demonstration at 36:08 in video

Round 17 to 25 (64 stitches in all of these rounds) - 1 sc in every stitch

Part 3: bottom section (decrease rounds - 20:49 in video)

Round 26 (56) - 6 sc, decrease

Round 27 (48) - 5 sc, decrease

Round 28 (40) - 4 sc, decrease

Round 29 (32) - 3 sc, decrease

Round 30 (24) - 2 sc, decrease

Round 31 (16) - 1 sc, decrease

Round 32 (8) - decrease

Round 33 (demonstration in video) - decrease until the hole is almost closed then slip stitch and fasten off

Part 4: wings (work directly on the body of the duck - in video)

Row 1 - attach your yarn and chain 1, sc x 4

Row 2 - chain 1 and turn your work, sc x 4

Row 3 - 2 sc decrease then fasten off

fairy frog 🧚

Part 1: top section (increase rounds - 7:54 in video)

Make a magic ring (or make a slip knot, chain 4, ss into the 1st chain, work the following stitches in the circle made in between the chains - if you're confused, you can watch the video at 8:58)

Round 1 - 8 sc

Round 2 (16) - 2 sc (increase) in every stitch 

Round 3 (24) - 1 sc, increase

Round 4 (32) - 2 sc, increase

Round 5 (40) - 3 sc, increase

Round 6 (48) - 4 sc, increase

Part 2: body (repeat rounds - 18:34 in video)

Round 7 to 12 (48 stitches in all of these rounds): 1 sc in every stitch

Part 3: bottom section (decrease rounds - 20:49 in video)

Round 13 (40) - 4 sc, decrease

Round 14 (32) - 3 sc, decrease

Round 15 (24) - 2 sc, decrease

Round 16 (16) - 1 sc, decrease

Round 17 (8) - decrease

Round 18 (demonstration at 25:00 in video) - decrease until the hole is almost closed then slip stitch and fasten off

Part 4: eyes (demonstration at 25:48 in video)

Make a magic ring (or make a slip knot, chain 4, ss into the 1st chain, work the following stitches in the circle made in between the chains - if you're confused, you can watch the video at 8:58)

Round 1 - 8 sc

Round 2 (16) - 2 sc (increase) in every stitch 

Round 3 (16) - 1 sc in every stitch

Part 5: white circle

Make a magic ring (or make a slip knot, chain 4, ss into the 1st chain, work the following stitches in the circle made in between the chains - if you're confused, you can watch the video at 8:58)

Round 1 - 8 sc

Round 2 (16) - 2 sc (increase) in every stitch 

Round 3 (24) - 1 sc, increase

Round 4 (32) - 2 sc, increase

Part 6: wings (demonstration at 31:42 in video)

Big part of the wing - make a slip, chain 5, skip the first chain then sc x4, insert 2 more sc in the last chain, work on the other side of the chains now...sc x2, ss, continue directly to the next part

Small part of the wing - chain 3, skip the first chain then sc x2, ss into the stitch at the bottom of the big wing

connect with me and share your work in our community by tagging me on instagram & tiktok @mahumcrochets - lots of love as always,

Mahum