Tampilkan postingan dengan label bookish crochet. Tampilkan semua postingan

Selasa, 11 Juni 2024

it ends with us inspired book sleeve (crochet pattern/tutorial)

Hi everyone! So many of you asked me to crochet a book sleeve and here's my attempt at crocheting one inspired by It Ends With Us. I'm not completely happy with the result, but I'll be turning this into a series where I crochet book sleeves/covers inspired by some books I love, so many more bookish projects are coming in the future!

A note on this pattern: I've included step-by-step instructions for how I made the book sleeve part but the lily flower charm is not my original design! I've included the link to the youtube tutorial I followed to make it as well as some details related to that part. With this pattern, I'm taking credit for the way in which I crocheted the book sleeve and the idea behind it, NOT the lily flower. That being said, I can't wait to see what you come up with! Please tag me in your creations (or send me a picture!) and feel free to DM me on Instagram (@mahumcrochets) if you have any questions.

Materials & Terminology:

I used a 4.5 mm hook, off-white and light pink yarn appropriate for that hook size, and a thinner magenta yarn. Abbreviations: HDC - half double crochet, SS - slip stitch, CH - chain.

Part 1: The sleeve
Start by making a slipknot and chain the length of your book's spine, hdc into the second ch from your hook till the end of the row, when you reach the last ch space - hdc 3 into the same ch, now you'll be working on the other side of your chains not on top of the hdc row that you just made, insert 1 hdc into every ch till the end of the row, when you reach the space where you inserted your very first hdc in the beginning - insert 2 more hdc into the same space (total 3 hdc in that space), now you'll be working in rounds without any increases or chains in between - keep inserting 1 hdc into every stitch till the sleeve is as big as you want.

Part 2: The flower & leaf charm
I used a thicker light pink yarn first and followed this tutorial for 2 rows of petals: click here.

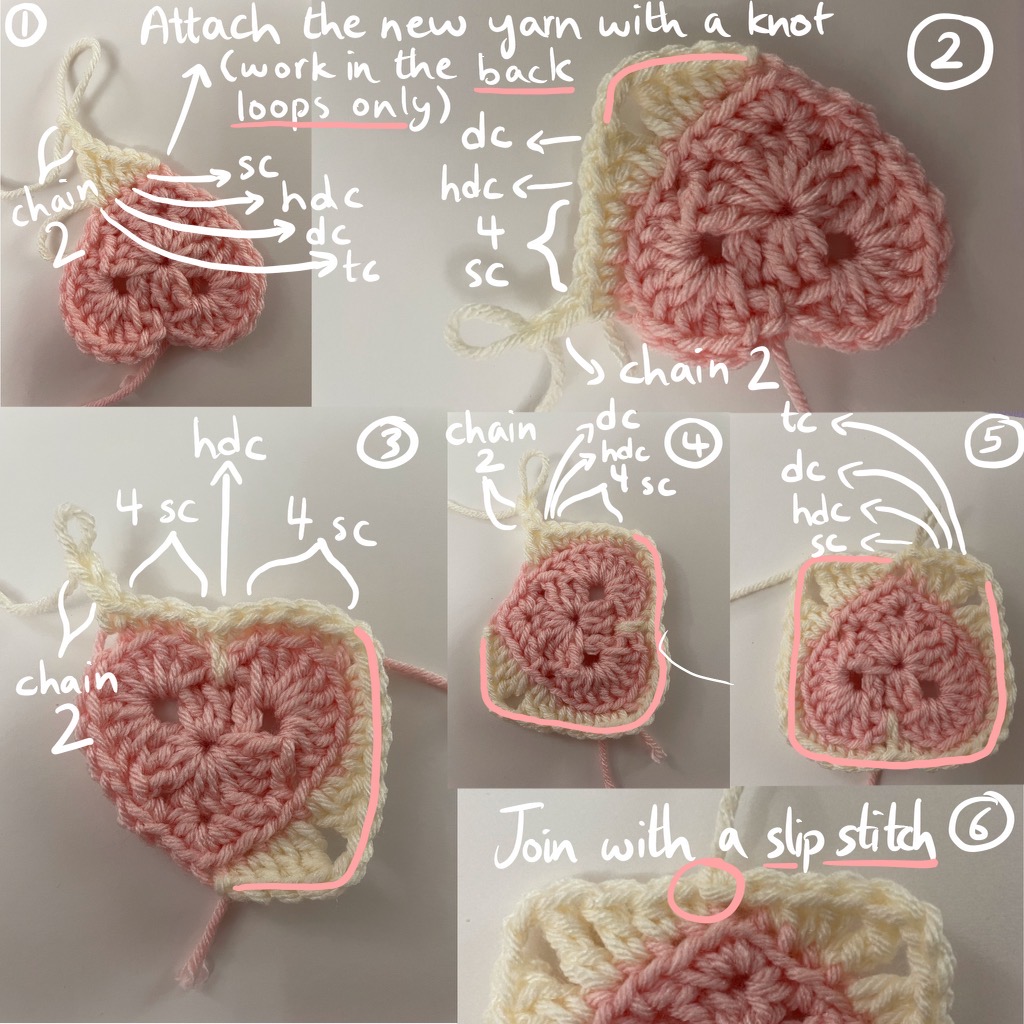
For the magenta part, I used a thinner yarn and did the following steps that are similar to what's shown in the tutorial but decreased them to make the center part smaller: start with a magic ring, ch 2, hdc 6 into the magic ring, ss into the top of the ch 2, ch 4, ss into the 2nd ch from your hook, ss into the other 2 chains, repeat the steps in asterisks around the round *ss into the front loop of the hdc stitch, ch 4, ss into the 2nd ch from your hook, ss into the other 2 chains*, ss into the first stitch you made, ch 1 or 2 to fasten off and cut.

I followed this tutorial for the leaf: click here. When you're done, sew the pieces in the center of your book sleeve (you just have to sew the middle of the flower on your sleeve). 

Part 3: The border and clasp
Attach your border yarn color to any stitch with a knot, insert 1 hdc into every stitch around the round, ss into the first hdc you made, ss in every hdc stitch that you made around the sleeve till you reach the part where you want to add your clasp, ch the length you want for the clasp, leave a bit of gap and ss back into the hdc stitches, continue ss around the sleeve till you reach the first ss you made, ch 1 or 2 to fasten off and cut.

And you're done!

I hope you found this pattern helpful, I'm still in the process of learning and trying to navigate the crochet community, so I'd love feedback from you! Please let me know what could've been improved or just your general thoughts on the pattern. I can't wait to see what you all create, don't forget to tag me on Instagram, and happy crocheting!


https://www.facebook.com/media/set/?vanity=61558923082872&set=a.122120178866297436
https://www.facebook.com/media/set/?vanity=61558923082872&set=a.122120179466297436
https://www.facebook.com/media/set/?vanity=61558923082872&set=a.122120179526297436
https://www.facebook.com/media/set/?vanity=61558923082872&set=a.122120179598297436
https://www.facebook.com/media/set/?vanity=61558923082872&set=a.122120179682297436
https://www.facebook.com/media/set/?vanity=61558923082872&set=a.122120179868297436
https://www.facebook.com/media/set/?vanity=61558923082872&set=a.122120179934297436
https://www.facebook.com/media/set/?vanity=61558923082872&set=a.122120180072297436
https://www.artstation.com/artwork/elANDP
https://www.artstation.com/film-metamorfosi-dell-essere-streaming-ita-filmdavedere/profile
https://www.artstation.com/artwork/QXA3oB
https://www.artstation.com/cb01-metamorfosi-dell-essere-film-intero-streaming-ita/profile
https://www.artstation.com/artwork/04yvZy
https://www.artstation.com/altadefinizione-metamorfosi-dell-essere-streaming-ita/profile
https://soundcloud.com/wahono-rulles/film-metamorfosi-dellessere-streaming-ita-filmdavedere-720p
https://soundcloud.com/wahono-rulles/altadefinizione-metamorfosi-dellessere-streaming-ita
https://soundcloud.com/wahono-rulles/metamorfosi-dellessere-streaming-ita-altadefinizione-film-cb01
https://soundcloud.com/wahono-rulles/guarda-film-metamorfosi-dellessere-streaming-ita-cb01-web-dl
https://soundcloud.com/wahono-rulles/cb01-metamorfosi-dellessere-streaming-ita-2023-in-alta-definizione
https://soundcloud.com/wahono-rulles/openload-metamorfosi-dellessere-streaming-ita-2023-in-alta-definizione
https://soundcloud.com/wahono-rulles/cb01-metamorfosi-dellessere-film-intero-streaming-ita
https://soundcloud.com/wahono-rulles/films-cb01-metamorfosi-dellessere-streaming-ita-2024-in-altadefinizione-1080p
https://metamorfosidellesserefilmint.tumblr.com
https://medium.com/@shoyohinata352/sdfgdfhhjfdgfdghfg-dfhgjhkhgfhfgfg-e82b0458630b
https://dojour.us/e/30320-ggsdfsdfddfhfggfg
https://matters.town/a/lsg5rx7v2jou?utm_source=share_copy&referral=husniada808
https://herbalmeds-forum.biolife.com.my/d/77876-ssdfsasfdsfsdsfsdfsdgdfs-dfhfhh
https://hackmd.io/@Baymina21/rkPTJFHSR

Minggu, 09 Juni 2024

crochet love letter book sleeve pattern (the cutest way to gift a book!)

Hi everyone! Here's a Pinterest-inspired love letter book sleeve that's made to measure.

A note on this pattern: I've included step-by-step instructions with pictures for how I made the book sleeve part and heart charm, but if you're a complete beginner, you might not be able to make this. This pattern is similar to my "it ends with us" inspired book sleeve, but uses single crochet instead of half double. Additionally, with this pattern, I'm taking credit for the way in which I crocheted the book sleeve and heart to look like a letter, NOT the idea behind it since I came across the concept on Pinterest. That being said, I can't wait to see what you come up with! Please tag me in your creations (or send me a picture!) and feel free to DM me on Instagram (@mahumcrochets) if you have any questions.

Materials & Terminology:

I used a 4.5 mm hook, off-white and red yarn appropriate for that hook size, and a titch button to secure the sleeve when closed. Abbreviations (US terms): SC - single crochet, SS - slip stitch, CH - chain, DC - double crochet, TC - triple crochet, SC2TOG - single crochet 2 stitches together, this is basically a sc decrease, to do this: insert hook into a stitch, yarn over and pull up a loop (2 loops on your hook), insert hook into the next stitch, yarn over and pull up a loop (3 loops of your hook), yarn over and pull through all the 3 loops on the hook.

Part 1: The body of the sleeve

Start by making a slipknot and chain the length of your book's spine, sc into the 2nd ch from your hook, sc 1 in each ch till the end of the row, when you reach the last ch - sc 3 into that same ch.

Now you'll be working on the other side of your chains not on top of the sc row that you just made. Insert 1 sc into every bottom ch till the end of the row, when you reach the space where you inserted your very first sc in the beginning - insert 2 more sc into the same ch space (total 3 sc in that space), now you'll be working in rounds without any increases or chains in between - keep inserting 1 sc into every stitch till the sleeve is as big as you want.


Part 2: The envelope flap

Once the body of your sleeve is as big as you want, stop crocheting in rounds and instead do 2-3 rows of sc. To do this: sc halfway around your sleeve (like the arrow in the picture), turn your work and sc into the same stitch that you just made, sc 1 in every stitch till the end of the row, continue doing 2-3 rows (start a new row by turning your work and sc into the last stitch you made at the end of the previous row). These rows will cover your book when you close the "love letter", if you don't do them then the corners of your book will show when you close the flap.


To make the triangle part, start your new row with a sc2tog (see the "materials & terminology" part for how to do this), sc 1 in every stitch across the row till you have 2 stitches left, sc2tog to end the row.

Start the next row by turning your work, then sc2tog, sc 1 in every stitch across the row till you have 2 stitches left, sc2tog to end the row. Repeat doing rows till you have 1 stitch left at the top, ch 1 or 2 to fasten off and cut.

To make the flap neater, we're going to do a border of ss down both sides of the triangle. Attach your yarn with a knot at one end of the triangle (any bottom side), ss around the sides of the triangle (there's no definite place to insert your hook so just insert it as closest to the edge as you can), ch 1 or 2 to fasten off and cut.

Part 3: The Heart <3

Start by making a magic ring and ch 2. 
Insert all of the next stitches into the magic ring: 
3 tc, 3 dc, ch 1, 1 tc, ch 1, 3 dc, 3 tc, ch 2, ss into the magic ring, ch 1 or 2 then cut and fasten off by tightening the ends.
I added a titch button to my book sleeve to keep the flap secure when I close it. Then, I sewed the heart onto the flap.

And you're done!

I hope you found this pattern helpful, I'm still in the process of learning and trying to navigate the crochet community, so I'd love feedback from you! Please let me know what could've been improved or just your general thoughts on the pattern. I can't wait to see what you all create, don't forget to tag me on Instagram, and happy crocheting!


https://x.com/CB01MecontroTe
https://www.artstation.com/artwork/8b9gDQ
https://www.artstation.com/sub-ita-me-contro-te-il-film-operazione-spie-streaming-ita/profile
https://sub-ita-me-contro-te-ilfilm.tumblr.com
https://cb01-me-contro-te-il-film-intero.tumblr.com
https://cb01-hd-me-contro-te-il-film-ita.tumblr.com
https://me-contro-te-il-film-intero-cb01.tumblr.com
https://medium.com/@shoyohinata352/sub-ita-me-contro-te-il-film-operazione-spie-streaming-ita-d449b99b6612
https://medium.com/@shoyohinata352/cb01-hd-me-contro-te-il-film-operazione-spie-streaming-ita-b4d9a1448f52?postPublishedType=initial
https://medium.com/@shoyohinata352/films-cb01-me-contro-te-il-film-operazione-spie-streaming-ita-2024-in-altadefinizione-56a5129d0b34
https://medium.com/@shoyohinata352/guarda-me-contro-te-il-film-operazione-spie-film-intero-cb01-6a4c68790d0f
https://dojour.us/e/30214-guarda-me-contro-te-ii-film-operazione-spie-film-intero-cb01
https://matters.town/a/za4lio6p32r6?utm_source=share_copy&referral=husniada808
https://herbalmeds-forum.biolife.com.my/d/77415-guarda-me-contro-te-ii-film-operazione-spie-film-intero-cb01
https://hackmd.io/@Baymina21/rJJA3eNB0

Rabu, 05 Juni 2024

matching pair of heart bookmarks - crochet pattern & tutorial

Hi everyone! Here's the written pattern for bookmarks for both sides of the heart (left & right). This is a companion pattern to my YouTube tutorial which you can watch here to understand how to switch colors. These bookmarks will also make the cutest little gifts for you & your reader friends/family!

Abbreviations & materials used:

sc - single crochet / ch - chain / BC - background color / CC - contrasting color (color of the heart) / I used a 4.5 mm hook & 100% acrylic yarn to make my bookmarks sturdy. If you want to adjust the size of these bookmarks (eg. make the heart bigger or the bookmark wider), you can learn how to create & crochet with your own pixel grids from this tutorial of mine.

Bookmark 1 (heart's right side)

Row 1: start with a slip knot and ch 6, sc into the 2nd ch from your hook, insert 1 sc into every ch (total 6 stitches in each row which is the same number of boxes in the pixel grid)

Row 2 - 10: insert 1 sc into every stitch with BC

Row 11: sc 6 with BC, switch colors to CC on 6th stitch

Row 12: sc 1 CC, switch colors on 1st stitch, sc 5 with BC

Row 13: sc 4 with BC, switch on 4th, sc 2 with CC

Row 14: sc 3 with CC, switch on 3rd, sc 3 with BC

Row 15: sc 2 with BC, switch on 2nd, sc 4 with CC

Row 16: sc 5 with CC, switch on 5th, sc 1 with BC

Row 17: sc 2 with BC, switch on 2nd, sc 3 with CC, switch on 3rd, sc 1 with BC

Row 18 - 28: sc 6 with BC

Bookmark 2 (heart's left side)

Row 1: start with a slip knot and ch 6, sc into the 2nd ch from your hook, insert 1 sc into every ch (total 6 stitches in each row which is the same number of boxes in the pixel grid)

Row 2 - 11: insert 1 sc into every stitch with BC

Row 12: sc 5 with BC, switch on 5th, sc 1 with CC

Row 13: sc 2 with CC, switch on 2nd, sc 4 with BC

Row 14: sc 3 with BC, switch on 3rd, sc 3 with CC

Row 15: sc 4 with CC, switch on 4th, sc 2 with BC

Row 16: sc 1 with BC, switch on 1st, sc 5 with CC, switch on 5th

Row 17: sc 1 with BC, switch on 1st, sc 3 with CC, switch on 3rd, sc 2 with BC

Row 18 - 28: sc 6 with BC

Happy reading & crocheting! - Lots of love, Mahum

Kamis, 30 Mei 2024

how to crochet tulip book cover & sleeve | free pattern + video tutorial for beginner-friendly tulip stitch


Hi everyone! This is the companion pattern for my 
youtube tutorial. Please keep in mind that you can customize these patterns to make your piece ANY SIZE. Always refer to the video tutorial if you're confused for a clear demonstration.

ss - slip stitch / sc - single crochet / dc - double crochet

Book Cover

Front:

Chain a length that's the same as the width of your book (the total number of chains should be a multiple of 3 + 2)

Row 1 - skip the 1st chain then sc into every chain

Row 2 - chain 1, turn your work, sc into every stitch, change colours to green in the last sc

LEAVES Row 3 - chain 4, turn your work, dc into the 1st stitch, repeat *skip 2 stitches, dc into 3rd stitch, chain 2, dc in the same stitch*, change colours to pink in the last dc

TULIPS Row 4 - chain 2, repeat *insert a 5 dc cluster into every chain 2 space, chain 2*, change colors to white in the last cluster

Row 5 - chain 1, repeat *1 sc in every tulip stitch, 2 sc in every chain 2 space*

Row 6 - chain 1, turn your work, sc into every stitch

Row 7 onwards - repeat the steps for the leaves, tulips, and plain rows until the cover is the same size as your book

Border:

Attach your yarn in the right-hand bottom corner of the front pieces - ss along all 4 edges

Book spine:

Crochet rows of sc until the piece covers the spine of your book (do not chain 1 when starting a new row, simply turn your work and sc into the 1st stitch)

Back:

Crochet rows of dc until the piece covers the back of your book (do not chain 2 when starting a new row, simply turn your work and dc into the 1st stitch)

Clasps (do this on all 4 corners of your cover, work on the back side):

Attach your yarn with a knot, chain 3-4 (make sure it's tight), slip stitch to join back, fasten off


Sleeve (you can make this any size and use it for your laptop, ipad, book, etc)

Chain the length that you want (the total number of chains should be a multiple of 3)

Round 1 - Skip the 2 chains near your hook then dc into the 3rd chain, dc into every chain, insert 2 more dc in the last chain

Dc into the other side of the chains as well, insert 1 more dc into the last chain

The total number of dc stitches should be a multiple of 3 + 1, then ss into the chain 2

Round 2 - chain 2, dc into every stitch, insert hook into the chain 2 then change colours

LEAVES Round 3: chain 4, dc into the 1st stitch, repeat *skip 2 stitches, dc into 3rd stitch, chain 2, dc in the same stitch*, insert hook into the chain 4 then change colours

TULIPS Round 4: chain 2, repeat *insert a 3 dc cluster into every chain 2 space, chain 2*, insert hook into the chain 2 then change colours

Round 5 - chain 2, repeat *1 dc in every tulip stitch, 2 dc in every chain 2 space*, ss into chain 2

Round 6 - chain 2, dc in every stitch

Round 7 onwards - repeat the steps for the leaves, tulips, and plain rounds until the sleeve is the size you want

Optional: sew on buttons and crochet clasps like the demonstration in the video

connect with me and share your work in our community by tagging me on instagram & tiktok @mahumcrochets - lots of love as always,

Mahum

Jumat, 24 Mei 2024

emma book cover crochet pattern (with pictures!)

Hi everyone! I am so excited to share this free pattern with you.

Here are a few things to keep in mind while using this pattern:

The heart granny square is not my original idea! With this pattern, I'm only taking credit for the way in which I crocheted the heart granny square into a book cover. All the steps I took are either mentioned explicitly or linked to a specific technique or youtube tutorial I used. To be able to make this, you should be an advanced beginner or intermediate-level crocheter. That being said, I can't wait to see what you come up with! Please tag me in your creations (or send me a picture!) and feel free to DM me on Instagram (@mahumcrochets) if you have any questions.

Materials & Terminology:

I used a 4.5 mm hook, less than 50 g of light-colored yarn, and somewhere between more than 50 but less than 100 g of pink yarn.
Abbreviations used: SC - single crochet, DC - double crochet, HDC - half double crochet, TC - triple crochet, SS - slip stitch, CH - chain.

Part 1: Crocheting a heart granny square

Crochet a heart following this youtube tutorial: crochet heart granny square tutorial. Once you're done crocheting the heart, you can either keep following the video (don't forget to refer back to this pattern for the steps that come afterward) to make the granny square or follow the pattern below.

Border 1:
 Attach the new yarn color with a knot at the bottom of the heart. Work in the back loops ONLY.

Follow this pattern as you go around the stitches of the heart (don't skip any stitch):

Sc, hdc, dc, tc, chain 2, dc, hdc, sc, sc, sc, sc, chain 2, sc, sc, sc, sc, hdc, sc, sc, sc, sc, chain 2, sc, sc, sc, sc, hdc, dc, chain 2, tc, dc, hdc, sc into the stitch where you attached the yarn, slip stitch into the next stitch, chain 1 to fasten off then cut the yarn.


Border 2: Attach the next yarn color with a knot or ss into one of the gaps made by the chain 2. Work in the gaps made by the chain 2 previously or the 3rd stitch after a chain 2 gap (shown in the pictures)

Ch 3 and in the same stitch insert 2 dc (the ch 3 counts as your first dc so there are basically 3 dc in the stitch where you attached the yarn), ch 1, 3 dc, ch 1, CORNER *3 dc, ch 2, 3 dc*, ch 1, repeat adding *3 dc, ch 1* till you reach a corner (*3 dc, ch 2, 3 dc*), once you get to the stitch where you attached the yarn - dc into the same stitch, ch 2, ss into the top of the first ch 3, ch 1 to fasten off (you can cut the yarn).


Border 3 onwards: work into the gaps between the chain 1 or chain 2 spaces ONLY. 

Attach yarn into a chain 2 gap, ch 3, 2 dc, ch 1, repeat *3 dc, ch 1* in every chain 1 gap. When you reach every chain 2 gap, repeat *3 dc, ch 2, 3 dc* to make a corner. When you reach the same chain 2 gap where you attached the yarn, insert 3 dc again, ch 2, ss into the top of the ch 3, and ch 1 to fasten off (you can cut the yarn to tighten).

Keep creating borders, alternating between colors, till the square is the same width as your book (as shown in the left picture).

After that, add a border row on the top and bottom of the square to give it a rectangle shape. You can do this by attaching the yarn into a chain 2 gap with a knot, ch 3, 2 dc, ch 1, and repeat *dc 3, ch 1* till you reach the corner, fasten off and repeat at the bottom row. You can repeat adding rows on the top and bottom until there's a bit of gap left (as shown in the right picture).

Attach the next yarn color at the bottom left corner of your square.

The next steps are shown in the picture and the pink arrows show which direction to work in. Sc in the back loops of every stitch till you reach the corner, ch 3 - skip the corner stitches - ss into the stitch after (this creates a space in which you can tuck the corner of your book to put the cover on), ss into every stitch till you reach the next corner, ch 3 - skip the corner stitches - ss into the stitch after, sc in the back loops of every stitch all around till you reach the stitch where you attached the yarn. ss into that stitch, ch 1, turn your work and now do rows of sc back and forth.

Keep doing rows of sc until the rows are as big as your book's spine.

Once you're done, start doing rows of dc until the rows are as big as the back of your book. Make the rows a bit smaller than the back, this will create a nice tight stretch when you put the cover on. Fasten off once you're done.


Attach the same yarn color into the first dc row at the top. Ss in every stitch across the top until you reach the corner, ch 3 - skip the corner - ss into the stitch after (this creates a space where you can tuck the corner of your book to put the cover on), ss into every stitch until you reach the next corner, ch 3 - skip the corner - ss into the stitch after, ss into every stitch across the bottom till you reach the end of your dc rows, fasten off.

And you're done!

I hope you found this pattern helpful and got to create a cute book cover with it too. I'm still in the process of learning and trying to navigate the crochet community, so I'd love feedback from you! Please let me know what could've been improved or just your general thoughts on the pattern. I can't wait to see what you all create, don't forget to tag me on Instagram, and happy crocheting!