Minggu, 26 Mei 2024

cute crochet tapestry ideas (free pixel grids + written patterns)


Hi everyone! Included in this post are the pixel grids I used to crochet the tapestries featured in my new series - easy wall decor on youtube. As a reminder, you can learn how to crochet with pixel grids with my "how to crochet ANY pixel grid" youtube tutorial. Happy crocheting <3

Save $ when you purchase this tapestry patterns bundle! 

1. Boris & Miffy (written pattern is available here: https://ko-fi.com/s/f2d7f9b6f0)


2. Black cat (written pattern is available here: https://ko-fi.com/s/58555740d1)


3. Duotone bow (written pattern is available here: https://ko-fi.com/s/3349128883)


tulips in a pot bag charm inspired by harry styles (free crochet pattern + video tutorial)

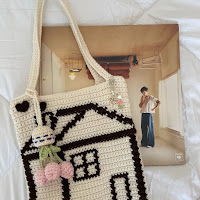
Hi everyone! This is the written pattern for your reference as seen in my youtube tutorial. Please refer to the tutorial for demonstrations on how to attach the pieces together. Harry's house tote bag tutorial is also on my channel!

Abbreviations:

ss - slip stitch / sc - single crochet / hdc - half double crochet / dc - double crochet


Part 1: Tulip

Make a magic circle and chain 1

[ Always mark the 1st sc of every round with a stitch marker or bobby pin! ]

Round 1 - 6 sc into the magic circle

Round 2 - 2 sc in every stitch (total 12)

Round 3 to 6 - 1 sc in every stitch (total 12 in each round)

Ss into the marked stitch and fasten off

Part 2: Stem & leaves

Make a slip knot and chain 16

Skip the 1st chain and follow the pattern below from the 2nd chain onwards...

Sc, hdc, dc x 2, sc, ss, fasten off

Part 3: Pot

Make a magic circle and chain 1

[ Always mark the 1st sc of every round with a stitch marker or bobby pin! ]

Round 1 - 8 sc into the magic circle

Round 2 - 2 sc in every stitch (total 16)

Round 3 - 1 sc in the back loops only (total 16)

Round 4 to 7 - 1 sc in every stitch (total 16 stitches in every round)

Ss into the marked stitch and fasten off

Optional - embroider patterns onto the pot

Part 4: Soil

Make a magic circle and chain 1

[ Always mark the 1st sc of every round with a stitch marker or bobby pin! ]

Round 1 - 8 sc into the magic circle

Round 2 - 2 sc in every stitch (total 16)

Ss into the marked stitch and fasten off

Part 5: Chain hanging

Make a slip knot and chain the length you want for the hanging (I did 32 chains)

Fasten off and attach into the centre of the magic circle of the pot

Happy crocheting & lots of love as always,

Mahum

Sabtu, 25 Mei 2024

how to crochet a cute teddy bear wearing cardigan (free pattern + video tutorial)


Hi everyone! This is the written pattern for my youtube tutorial. I highly recommend watching the video tutorial first for demonstrations so you can accurately follow the pattern. Also, please refer to the helpful timestamps on the youtube video if you're confused about any part of the pattern!

Abbreviations/terminology:

ss - slip stitch / sc - single crochet / increase - 2 sc in the SAME stitch 

Note: work in continuous rounds and use a stitch marker or bobby pin to mark the first stitch of every round ALWAYS

*for all the swifties & harries!* shop the loveliest jewelry from LPS: https://lepetitesprout.com

shop cardigans (5% off with code MAHUM): https://taytaymerch.com/?ref=mahum (lover and midnights cardigan!)


Bear plushie

1. Head

Start by making a slip knot, chain 4, ss into the first chain, insert the stitches into the circle formed between the chains...

Round 1 - 8 sc

Round 2 - 2 sc in every stitch (total 16)

Round 3 - 1 sc, increase (total 24)

Round 4 - 2 sc, increase (total 32)

Round 5 - 3 sc, increase (total 40)

Round 6 - 4 sc, increase (total 48)

Round 7 to 16 - 1 sc in every stitch (total 48 in each round)

Round 17 - 4 sc, decrease (total 40)

Round 18 - 3 sc, decrease (total 32)

Round 19 - 2 sc, decrease (total 24)

Round 20 - 1 sc, decrease (total 16)

...ss into the stitch where your stitch marker/bobby pin is then fasten off (cut and pull)

2. Body

Start by making a slip knot, chain 4, ss into the first chain, insert the stitches into the circle formed between the chains...

Round 1 - 8 sc

Round 2 - 2 sc in every stitch (total 16)

Round 3 - 1 sc, increase (total 24)

Round 4 - 2 sc, increase (total 32)

Round 5 - 3 sc, increase (total 40)

Round 6 - 4 sc, increase (total 48)

Round 7 to 16 - 1 sc in every stitch (total 48 in each round)

Round 17 - 4 sc, decrease (total 40)

Round 18 - 1 sc in every stitch (total 40)

Round 19 - 3 sc, decrease (total 32)

Round 20 - 1 sc in every stitch (total 32)

Round 21 - 2 sc, decrease (total 24)

Round 22 - 1 sc, decrease (total 16)

...ss into the stitch where your stitch marker/bobby pin is then fasten off (cut and pull)

3. Legs

Start by making a slip knot, chain 3, ss into the first chain, insert the stitches into the circle formed between the chains...

Round 1 - 6 sc

Round 2 - 2 sc in every stitch (total 12)

Round 3 - 1 sc, increase (total 18)

Round 4 - 2 sc, increase (total 24)

Round 5 - 3 sc, increase (total 30)

Round 6 - 4 sc, increase (total 36)

Round 7 - 12 decreases, 12 sc (total 24)

Round 8 - 6 decreases, 12 sc (total 18)

Round 9 and 10 - 1 sc in every stitch (total 18)

Round 11 - 4 decreases

...ss into the stitch where your stitch marker/bobby pin is then fasten off (cut and pull)

4. Arms

Start by making a slip knot, chain 3, ss into the first chain, insert the stitches into the circle formed between the chains...

Round 1 - 6 sc

Round 2 - 2 sc in every stitch (total 12)

Round 3 - 1 sc, increase (total 18)

Round 4 - 1 sc in every stitch (total 18)

Round 5 - 1 sc, decrease (total 12)

Round 6 to 11 - 1 sc in every stitch (total 12)

...fill with stuffing, fold in half and sc the top together, fasten off

5. Ears & nose/mouth (make 3 pieces following the same pattern below)

Start by making a slip knot, chain 3, ss into the first chain, insert the stitches into the circle formed between the chains...

Round 1 - 6 sc

Round 2 - 2 sc in every stitch (total 12)

Round 3 - 1 sc, increase (total 18)

Round 4 - 1 sc in every stitch (total 18)

...ss into the stitch where your stitch marker/bobby pin is then fasten off (cut and pull)

Folklore cardigan (inspired by taylor swift)

1. Sleeves

Row 1 with white - make a slip knot, chain 25, skip the 1st chain then sc in every chain, change colours to black in the last sc (total 24 sc in every row)

Row 2 with black - chain 1, turn your work, sc in every stitch, change colours to white in the last sc

Row 3 with white - chain 1, turn your work, ss in every stitch, change colours to black in the last sc

Row 4 with black - chain 1, turn your work, sc in the front loops of every stitch, change colours to white in the last sc

Row 5 to 10 with white - chain 1, turn your work, sc in every stitch

2. Back piece

Row 1 with white - make a slip knot, chain 25 or more (I originally did 32 chains but it was way too long so I recommend doing less), skip the 1st chain then sc in every chain, change colours to black in the last sc

Row 2 with black - chain 1, turn your work, sc in every stitch, change colours to white in the last sc

Row 3 with white - chain 1, turn your work, ss in every stitch, change colours to black in the last sc

Row 4 with black - chain 1, turn your work, sc in the front loops of every stitch, change colours to white in the last sc

Row 5 to 14 with white - chain 1, turn your work, sc in every stitch

3. Front pieces

Row 1 with white - make a slip knot, chain 15, skip the 1st chain then ss in every chain, change colours to black in the last ss

Row 2 with black - chain 1, turn your work, sc in every stitch, change colours to white in the last sc

Row 3 to 5 with white - chain 1, turn your work, sc in every stitch

Row 6 - turn your work, skip the 1st stitch, sc into every stitch

Row 7 - turn your work, sc into every stitch until you have 2 stitches left, sc2together

Row 8 - turn your work, skip the 1st stitch, sc into every stitch

Row 9 - turn your work, sc into every stitch until you have 2 stitches left, sc2together

Row 10 - turn your work, skip the 1st stitch, sc into every stitch

Row 11 - turn your work, sc into every stitch until you have 2 stitches left, sc2together

Row 12 - turn your work, skip the 1st stitch, sc into every stitch

Row 12 - turn your work, sc into every stitch until you have 2 stitches left, sc2together

Patchwork cardigan (inspired by harry styles)

Follow the pixel grids to crochet the pieces and sew them together...

connect with me and share your work in our community by tagging me on instagram & tiktok @mahumcrochets - lots of love as always,

Mahum

nature-themed crochet room decor: garlands, hammock, & hanging plant pot (written patterns + video tutorial)


Hi everyone! Here are the written patterns for some nature-themed crochet pieces. As a reminder, please make sure to watch the youtube tutorial before attempting to follow the pattern because the format is a bit different than usual. 

1. Pot

Make a magic ring and chain 1

Round 1 - 8 sc

Round 2 - 2 sc in every stitch (total 16)

Round 3 - 1 sc, increase (total 24)

Round 4 - 2 sc, increase (total 32)

Round 5 - 3 sc, increase (total 40)

Round 6 - 4 sc, increase (total 48)

Round 7 - 1 sc in every stitch, work in the back loops only (total 48)

Round 8 to 18 - 1 sc in every stitch (total 48)

NOTE: To make the soil, do the same steps from round 1 to 6

2. Small leaf branches

Make a slip knot and chain 4

First leaf - 2 dc into the 3rd chain from your hook, chain 2 picot, 2 dc into the same chain, chain 2, ss into the same chain, ss into the next chain

Chain any number for the stem (I chain 5 after every leaf)

Second leaf onwards - chain 3 more for the leaf, 2 dc into the 3rd chain from your hook, chain 2 picot, 2 dc into the same chain, chain 2, ss into the same chain, ss into the next chain

Chain any number for the stem and repeat

3. Large leaf branches

Make a slip knot and chain 9

First leaf - sc into the 2nd chain from your hook, hdc, dc, 2 dc, dc, hdc, sc...

...chain 2 then work on the other side of the chains, sc, hdc, dc, 2 dc, dc, hdc, sc, chain 2, ss down the centre of the leaf, ss into the chain 2, ss into the stem chain

Chain any number for the stem (I chain 8 after every leaf)

Second leaf onwards: chain 8, sc into the 2nd chain from your hook, hdc, dc, 2 dc, dc, hdc, sc... 

...chain 2 then work on the other side of the chains, sc, hdc, dc, 2 dc, dc, hdc, sc, chain 2, ss down the centre of the leaf, ss into the chain 2, ss into the stem chain

Chain any number for the stem and repeat

4. Ruffle leaf branches

Make a slip knot then chain the length you want (I recommend at least 80-100)

Chain 2 more then dc into the 3rd chain from your hook

Row 1 - 2 dc into every chain

Row 2 - chain 2 and turn your work to start this next row, 1 dc into every stitch

5. Small flowers

First petal: Make a magic circle and chain 2, 1 dc, chain 2 then ss into the magic circle

Repeat 4 more times: chain 2, 1 dc, chain 2 then ss into the magic circle

6. Medium flowers

Make a magic circle and chain 1

Round 1 - 10 sc

Repeat 5 times (petals): chain 1 and hdc + dc in the same stitch, dc + hdc, chain 1 & ss in the next stitch

7. Large flowers

Make a magic circle and chain 1

Round 1 - 6 sc

Round 2 - 2 sc in every stitch (total 12)

Repeat 5 times (petals): chain 3, 4 tc in the same stitch, chain 3 then ss into the next stitch

8. Hammock (for holding yarns/plushies)

Make a slipknot and chain 6, ss into the first chain, chain 4

Work into the space formed between the chains: 1 dc, chain 2, 1 dc

Next row onwards: chain 4 and turn your work, 1 dc into every chain space and chain 2 after every dc, 1 dc into the 2nd chain at the end of the row

Jumat, 24 Mei 2024

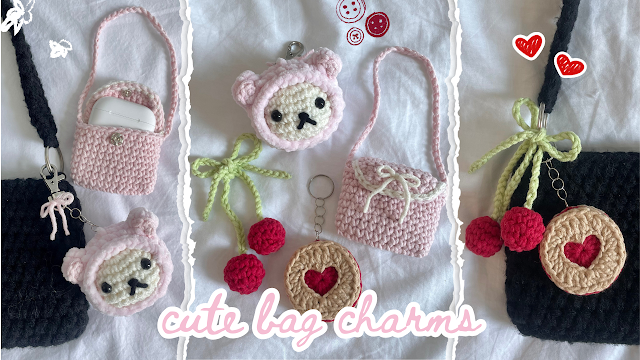
how to crochet cute bag charms/keychain | free patterns + video tutorial


Hi everyone! Here are the written patterns for the heart cookie (inspired by jammie dodgers), mini pouch (that you can use as an airpods case, coin purse, etc), cherries tied into a bow, & a cozy bear inspired by Korilakkuma...you can also watch the video tutorial for demonstrations.

Abbreviations:

ss - slip stitch / sc - single crochet / hdc - half double crochet / dc - double crochet

You can find the yarns I used with a 4 mm hook plus all other materials like keychains, safety eyes, and titch buttons on my amazon storefront.*

*I earn a small commission per purchase to get more yarns/materials for my projects. There is no extra cost for you, it's just another way to support me as a creator <3

Heart cookie:

Top piece - make a slip knot, chain 19, ss into the first chain, insert the following stitches into every chain starting from the first chain (the stitches in brackets go in the same chain)...

[sc + hdc}, 2 dc, [dc + hdc], [2 hdc] twice, [hdc + dc], invisible dc decrease, [dc + hdc], [2 hdc] twice, [hdc + dc], 2 dc, [hdc + sc], ss into the next top stitch and fasten off

Jam filling - make a magic ring & chain 2, insert 12 dc into the magic ring, ss into the top of the chain 2, chain 2 to start the next round, 2 dc into every stitch (total 24 stitches), ss into the top of the chain 2 & fasten off

Bottom piece - make a magic ring & chain 2, insert 13 dc into the magic ring, ss into the top of the chain 2, chain 2 to start the next round, 2 dc into every stitch (total 26 stitches), ss into the top of the chain 2 & fasten off

Cherries:

Round 1 - make a magic ring & chain 1, insert 6 sc into the magic ring

Round 2 - 2 sc in every stitch (total 12)

Round 3 & 4 - 1 sc in every stitch (total 12 in every round)

Round 5 - 6 sc decrease, ss & fasten off

Bow chain - make a slip knot & chain at least 45

Bear:

Round 1 - make a magic ring & chain 1, insert 6 sc into the magic ring

Round 2 - 2 sc in every stitch (total 12)

Round 3 - 1 sc, increase (total 18)

Round 4 - 2 sc, increase (total 24)

Round 5 to 9 - 1 sc in every stitch (total 24 in every round)

Round 10 - 2 sc, decrease (total 18)

Embroider the face, add safety eyes & stuffing...

Round 11 - 1 sc, decrease (total 12)

Round 12 - 6 decreases, ss & fasten off

To make the hat, repeat the same steps from rounds 1 to 8 (or 9 if you need it to be longer). Then ss tightly in every stitch as the last round & fasten off. 

Earsmake a magic ring & chain 1, insert 6 sc into the magic ring, ss & fasten off

Inner ear - make a magic ring & chain 1, insert 4 sc into the magic ring, fasten off

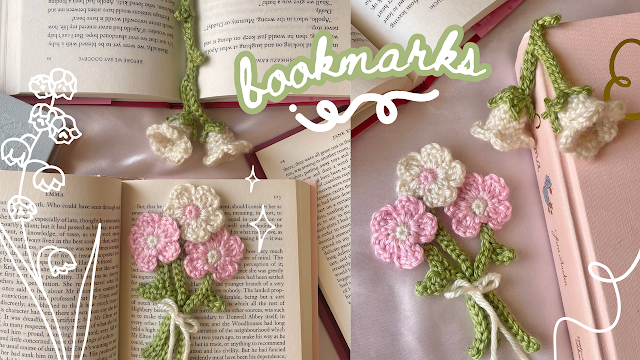
how to crochet flower bookmarks (lily of the valley & mini bouquet) | free patterns + video tutorial


Hi everyone! These are the written patterns for my youtube tutorial. Please use these written instructions for reference, but watch the demonstrations in the video first to understand how to follow the steps. This is a scrap-yarn-friendly project so you don't need a lot of yarn for these bookmarks :)

1. Lily of the valley bookmark that looks like it's growing out of the book

How to crochet the bell-shaped flower:

Make a magic ring and chain 1

Round 1 - 5 sc, ss into the 1st stitch to end the round

Round 2 - chain 1 to start the round, insert 2 sc in every stitch (total 10 stitches), ss into the 1st stitch to end the round

Round 3, 4, and 5 - chain 1 to start the round, insert 1 sc in every stitch (total 10 stitches), ss into the 1st stitch to end the round

Round 6 (petals) - repeat 5 times...in the same stitch *ss, sc, hdc*, in the next stitch *hdc, sc, ss*

To end your work, chain 1 and fasten off.

How to crochet the bottom leaves (optional):

Make a magic ring and chain 1

Round 1 - 4 sc, ss into the 1st stitch to end the round

Round 2 - repeat 4 times...chain 3, skip the 1st chain, ss into the 2nd chain, sc into the 3rd chain, ss into the next stitch

To end your work, chain 1 and fasten off.

How to crochet the stem and leaves:

Make a slip knot and chain the length you want for the bookmark. Chain 4-8 more to make the stem for the 1st flower. Turn the chains to the back side, skip the 1st chain, then ss into the middle loops of those chains. 

Chain 6-10 more to make the stem for the 2nd flower. Turn the chains to the back side, skip the 1st chain, then ss into the middle loops of the chains all the way down. 

When you want to make a leaf, chain 3, skip the 1st chain, ss into the 2nd chain, sc into the 3rd chain, then continue ss into the middle loop of the chains.

To end your work, chain 1 and fasten off.

Sew the pieces together and you're done!

2. Flower bouquet bookmark that looks like pressed flowers

How to crochet forget-me-not flowers:

Make a magic ring and chain 1

Round 1 - 5 sc, ss into the 1st stitch with the colour of the petals to end the round

Round 2 (petals) - repeat 5 times...*chain 3, 2 dc in the same stitch, ss into the same stitch*

To end your work, chain 1 and fasten off.

How to crochet the stem and leaves:

Make a slip knot and chain the length you want for the stem (make it slightly longer with 4-6 extra chains because the length will shrink a bit). Turn the chains to the back side, skip the 1st chain, then ss into the middle loops of the chains. 

When you want to make a leaf, chain 5, skip the 1st chain, ss into the 2nd chain, sc into the 3rd chain, hdc into the 4th chain, sc into the 5th chain, then continue ss into the middle loop of the chains.

To end your work, chain 1 and fasten off.

Sew the stem onto the back side of the flower and you're done!


adorable frog holding a heart (customisable crochet pattern)

Hi everyone! This adorable frog can be turned into a charm, keychain, or mini pouch for your headphones (which you can attach to any of your bags with a chain). I can't wait to see how yours turn out!

Here are a few things to keep in mind while using this pattern:

To make this, you should be an advanced beginner, intermediate level crocheter, or know how to make a magic ring, crochet in a round (I've included step-by-step instructions for this), increase, single/double/half double/triple crochet, slip stitch, and most importantly - SEW. This pattern doesn't show you how to sew the pieces together. However, that part is pretty self-explanatory since you just have to sew the pieces as shown in my pictures in the pattern below. That being said, I can't wait to see what you come up with! Please tag me in your creations (or send me a picture!) and feel free to DM me on Instagram (@mahumcrochets) if you have any questions.

Materials & Terminology:

I used a 4.5 mm hook and these yarn colors: light pink (heart), green (frog), off-white (center of the frog and eyeballs), and brown (pupils and happy face). Abbreviations: SC - single crochet, DC - double crochet, HDC - half double crochet, TC - triple crochet, SS - slip stitch, CH - chain.

Part 1: The Heart <3
Start by making a magic ring and ch 2. Insert all of the next stitches into the magic ring: 3 tc, 3 dc, ch 1, 1 tc, ch 1, 3 dc, 3 tc, ch 2, ss into the magic ring, ch 1 or 2 then cut and fasten off by tightening the ends.

Part 2: The Frog's Body 
Round 1 (off-white) - Start by making a magic ring and ch 2. Insert 10 dc into the magic ring. Ss into the top of the ch 2 (total 10 stitches)
Round 2 (off-white) - ch 2, insert 2 dc into every stitch around the round until you reach the ch 2, ss into the top of the ch 2 (total 20 stitches)
Round 3 (green) - make a slip knot with your green yarn and attach it to your work with ch 2 in the ss you made with the off-white, repeat the steps in asterisks till the end of the round *dc, 2 dc in the same stitch* (for beginners: insert 1 dc into one stitch, then in the next stitch insert 2 dc)
Round 4 (green) - ch 1, repeat the steps in asterisks till the end of the round *sc, sc, sc, 2 sc into the same stitch*, ss into the ch 1, ch 1 or 2 then cut and fasten off by tightening the end.

[ Optional part ] If you want to turn your frog into a pouch for headphones, you need to also crochet the back part for it. To make that, follow the same steps as the frog's body with only green yarn. 


Part 3: The Frog's Hands
Attach your yarn into any of the stitches with a knot.
Row 1 - ch 1 and sc into the same stitch, sc 3 more times into the next stitches
Row 2 - turn your work and sc 4 times into the stitches from row 1
Row 3 - turn your work and sc 4 times into the stitches from row 2
For row 4 and 5, you need to sc 2 stitches together (sc2tog). To do this, you can into one stitch, pull up a loop (you’ll have 2 loops on your hook), go into the next stitch, pull up a loop (you’ll have 3 loops on your hook), yarn over and pull through all 3 loops. So in row 4, sc2tog 2 times and in row 5, sc2tog 1 time.

Part 4: The Details
Green (eyes) - start with a magic ring and ch 2, insert 9 hdc into the magic ring, ss into the top of the ch 2, ch 1 or 2 then cut and fasten off by tightening the ends.
Off-white (eyeballs) - start with a magic ring and ch 1, insert 6 sc into the magic ring, ss into the top of the ch 1, ch 1 or 2 then cut and fasten off by tightening the ends.
Pink (blush) - start with a magic ring and ch 1, insert 3 sc into the magic ring, ss into the top of the ch 1, ch 1 or 2 then cut and fasten off by tightening the ends.
Brown (pupils, I used a thinner yarn for this part) - start with a magic ring and ch 1, insert 2 sc into the magic ring, ss into the top of the ch 1, ch 1 or 2 then cut and fasten off by tightening the ends.

Part 5: Sew it all Together
I sewed all the eye pieces together first, then the frog's hands into the heart and body, then the blush onto the cheek area, and lastly the front part of the frog's body to the back. If you want to attach your frog to a bag: attach the green yarn into a stitch with a knot in the area you want your chain to start, chain till it's as long as the length you want, attach with a knot on the other side.

And you're done!

I hope you found this pattern helpful, I'm still in the process of learning and trying to navigate the crochet community, so I'd love feedback from you! Please let me know what could've been improved or just your general thoughts on the pattern. I can't wait to see what you all create, don't forget to tag me on Instagram, and happy crocheting!